Editing photos for a WordPress website using Irfanview
Why do I need to edit my images?
Irfanview is deservedly popular image editing software that enables you to easily crop, resize, add text or a watermark to your image, and optimise the file size for the web.
And it’s free*!
- Download and install Irfanview for free* from: Irfanview
(Click the Download button in the centre of the page.)
- *Free for private & educational use
- Then download and install all Irfanview Plugins from here:
- Find the photo you’d like to use (from where it’s saved on your computer in a folder) and right click on it, then click ‘Open with’ -> ‘Irfanview’
- To undo an action – click the blue ‘undo’ arrow on the task menu
Undo button on Irfanview
- NB: Only 1 previous action can be undone.
- Do not enlarge small photos – they will become pixilated.
- Optimising photos that have already been optimised may also cause problems.
How to crop an image to a predetermined size:
(e.g. Cropping the Barn Owl from this landscape photo at a size of 700px x 525px):
- Crop the image to the desired height first (leave the width at maximum for now)
- Click and draw a rectangle on the image where you want to crop it. You can adjust the size & shape of the box by clicking on any edge – then drag & drop.
- To drag & drop: keep the left mouse button pressed down while moving the mouse – then let go when the line is where you need it.
- Click ‘Edit‘ -> Crop selection from the top drop-down menu.
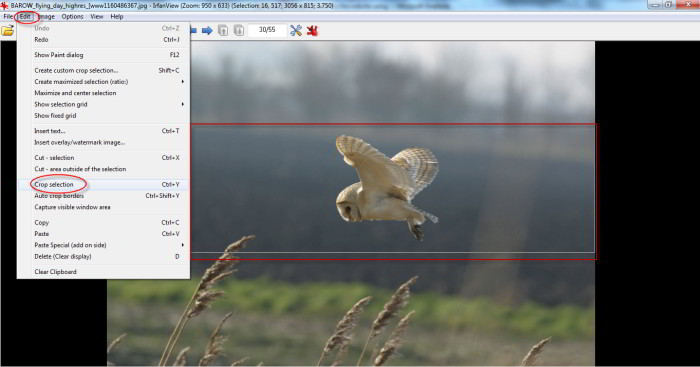
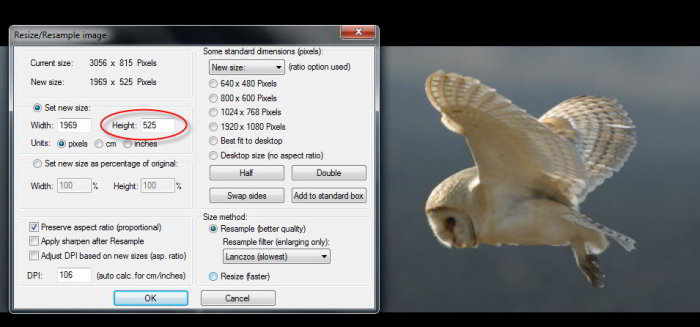
- How to set the height (e.g. to 525 pixels):
- Click ‘Image’ (on the task menu) -> then ‘Resize/Resample’
- Check ‘Pixels‘ and enter the height you want into the box (in this case 525),
- Make sure ‘Preserve aspect ratio’ is checked. (For most photos uncheck ‘Apply sharpen…)
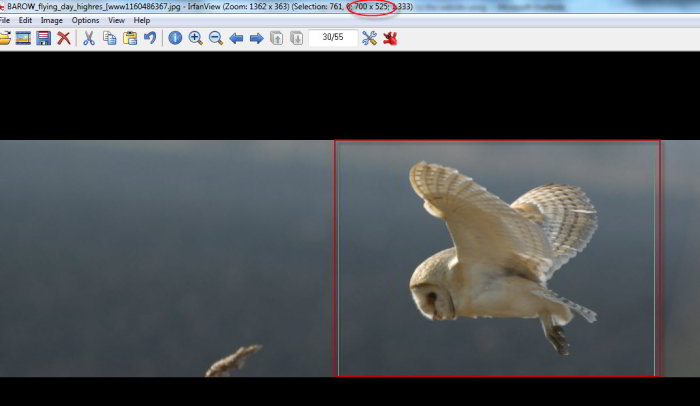
- Then crop the resized image to 700px width by dragging and dropping as before.
- The size you are cropping to can be seen along the top edge of the screen. (The inner 2 numbers, where it says ‘Selection’.)
You now have the option to add a watermark or text before optimising the file size and saving your image.
How to add a watermark image to a photo:
Crop &/or resize the photo first (but don’t optimise the file size yet.)
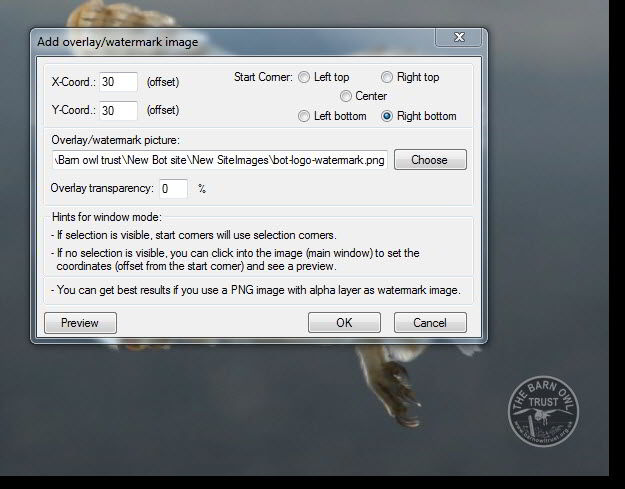
- Click ‘Edit’ -> ‘Insert overlay/watermark image’
- Start Corner = Right bottom (or wherever is appropriate for your image.)
- Choose the file location of your image or watermark. (The Choose button will open the folders on your computer – navigate to the image you want.)
- Watermark images are best created as a PNG file type which allows you to have a transparent background.
- Click on the button to see a preview – adjust the position if necessary.
How to add text to the photo:
Crop &/or resize the photo first (but don’t optimise the file size yet.)
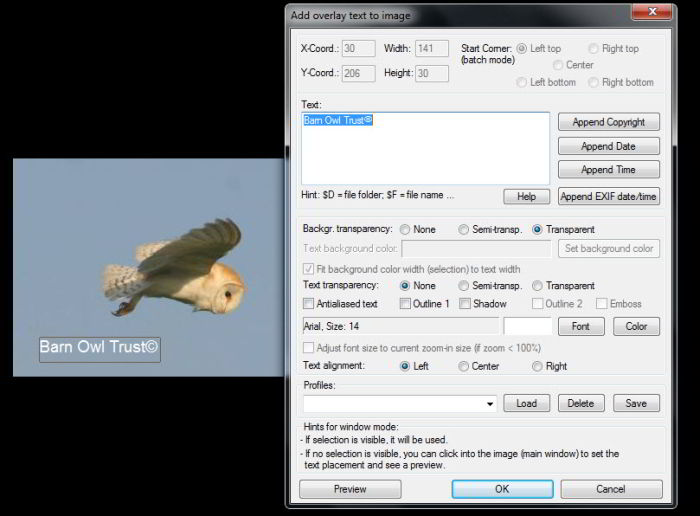
- Drag and drop to draw a box in bottom LH corner (if a watermark is in RH corner) – or wherever you want the text. Leave some space around the box (don’t draw the box right up against the edge of the photo.)
- To drag & drop: keep the left mouse button pressed down while moving the mouse – then let go when the line is where you need it.
- Click ‘Edit’ -> then ‘Insert text’
- Type the required text in the box that appears
- Click ‘Append copyright’ to add the copyright symbol
- Click ‘Font’ to open a window where you can select font style & size:
- For example, try Arial, size 14
- Click ‘Color‘ to open a window where you can select the font colour:
- Try white – or if this won’t show up – try black.
- Other settings to try:
- Background = Transparent
- Text transparency = None
- Text alignment = Left
Click ‘OK’.
About image copyright
How to optimise the file size and save for the web:
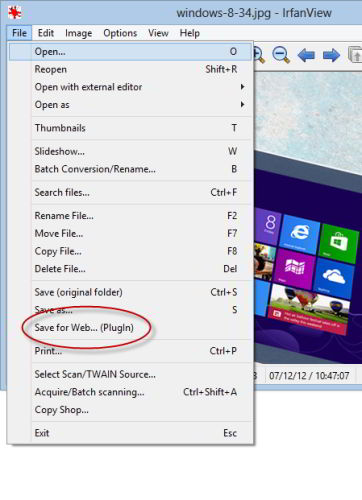
Under ‘
File‘ Click the ‘
Save for web’ option:
- Click the ‘JPEG’ tab (unless you are working with a simple graphic image, such as a diagram – use GIF.)
- Set the ‘Quality’ slider button to about 85; (Outdoor shots with a lot of detail, such as leaves, may need to be saved at a lower quality – perhaps 70.)
- Check the image file size – this should be between 20 and 85 KB. Around 30 – 50 KB is often ideal – but it depends on the image. (Over 100 KB or less than 10 KB might cause problems.)
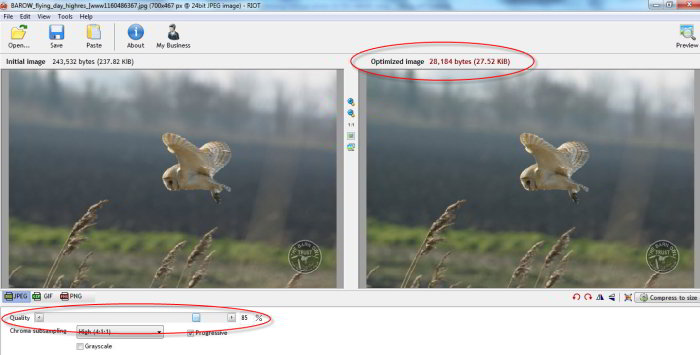
Click ‘Save’
- File name: type in a new file name which describes what is in the photo (e.g. barn-owl-flying-daytime)
(See Naming Images)
Other Irfanview tools:
Under ‘Image’ on the tool bar there are other tools which may sometimes be useful:
- ‘Rotate Left’ & ‘Rotate Right’; (Use to correct a sideways photo)
- ‘Horizontal Flip’ & ‘Vertical Flip’; (Produces a mirror image.)
- ‘Custom/Fine rotation’ (Can help if your photo is at an angle.)
- Sharpen’ (Can sometimes help with a slightly blurred photo.)
- ‘Auto adjust colors’ (Sometimes helps with a dull photo.)


